HotGloo Prototyping Features
HotGloo is entirely HTML based.
It runs smoother, faster and is more responsive than the HotGloo classic version has ever been.Working in HTML also means that you will be able to export your projects to HTML to save them offline for archiving purposed or for that client presentation where you already expect a wacky internet connection.Works on all devices
Work with HotGloo and test your projects on all devices. With the new HTML editor you can work on your projects and review them from any device. The most exciting news: you don't even have to select the screen view. Simply fire up a shared project link on your tablet or mobile and the system automatically redirects you to the according breakpoint of your responsive version.Collaborate with your team or send preview links to projects
We got it that not everyone is keen to add their clients to the account so that they can review at any time so we came up with something we call share links. In HotGloo you are able to send and monitor multiple share links of a project. You can password protect them, enable or disable public comments, share the whole project or particular pages only. Plenty of options for making collaborative reviewing as easy and convenient as possible.Review and comment on the go
HotGloo 5 comes with page notes to leave overall informations for coders or designers on a particular pages and comments that you can drag and drop on your work and choose who will be able to see a comment, gets a notification and even add a task to it.Test your prototypes on the designated devices
Send your mobile project right to your mobile and test your interactions on the mobile. Swipe through your prototypes and make use of mobile interactions like swipe, tap or tap and hold.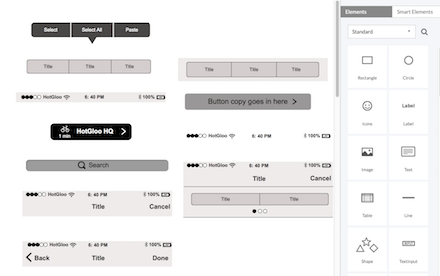
2000+ UI Elements
HotGloo sports a huge UI element library that offers not only standard UI elements for web, tablet and mobile but also ready built UI widgets like sign-up forms or credit card input fields. Over all you'll find over 2000+ elements listed.
When designing your interface, try to be consistent and predictable in your choice of interface elements. Whether they are aware of it or not, users have become familiar with elements acting in a certain way, so choosing to adopt those elements when appropriate will help with task completion, efficiency, and satisfaction. Interface elements include but are not limited to: Input Controls: checkboxes, radio buttons, dropdown lists, list boxes, buttons, toggles, text fields, date field Navigational Components: breadcrumb, slider, search field, pagination, slider, tags, icons Informational Components: tooltips, icons, progress bar, notifications, message boxes, modal windows Containers: accordion
Interactions
To add an interaction click the element that should trigger the interaction, select INTERACTIONS in the properties panel and make your selection. Test your interactions by switching to preview.
Set up interactions for an element, activated on:
- blur (interaction is fired once a text element loses the focus)
- change (fired upon element change)
- check/uncheck (fired upon item is being checked)
- click/tap (fired upon element click)
- focus (fired upon focus change)
- init (fired initially once you access the page the element is on)
- key press (fired upon certain key is pressed)
- mouse over/out (fired upon cursor over/out)
- swipe right/left/up/down (fired upon swipe in this direction)

Variable / Variable Builder
With the variable builder you can simulate different sets of varia- bles. An observer links an element to a determined variable and an interaction is being carried out when this variable is being executed.
e.g. You created a sign-in panel and want to set up different variables. A variable could be a distinction between a signed-in customer versus a website visitor. You want the customer experience the website differently from a visitor by displaying different views of a menu or a different website content. Now you can set up a variable set with the role: Users and the variables: visitors & customers. Use a sign-in button to flip to customers and tie an obersver to a viewstack element to show a different view when this variable is executed.

Adaptive design through responsive wireframing with HotGloo.
Once you add a new project you can choose which viewport you‘d like to set up as your default viewport. Choose a standard desktop width or if starting with a mobile rst approach then you‘d select one of the mobile preferences (you can also choose a custom page width for your default viewport).
Add viewports throughout your wireframing process Throughout your wireframing process you might want to add ano- ther viewport. You can do so by choosing ADD VIEWPORT in the upper le toolbar and choose your viewport.In a second step you can also choose if this viewport should copy/ paste any content from a previous viewport or if you‘d like to start with a blank page again. In the example above there are alrea- dy two mobile viewports been wireframed. For adding a desktop viewport you‘d select WEBISTE and copy elements from either the iPhone viewort or the iPad viewport.

Wireframe with a team. Review with stakeholders.
Invite others to your account and add them to projects
Invite team members or stakeholders to co-work on projects by inviting them to your account or by sending them share links. To add a new person just go to the PEOPLE page. Click the ADD PERSON button and fill out the details. We will send an invitation with further instructions to the person added. And don‘t forget to add them to a project!
Share a project via share links
Generate a share link right out of the editor or on the project page and email it to clients to preview the current project state. Choose if you want to share a particular page or screen view only. Decide if you want to show the sidebar and page notes, passwort protect your link and give the receiver the right to read/write comments on your designs.
Review prototypes and leave comments.
With HotGloo you can easily attach feedback comments to a particular element or area you want to discuss in depth with team members. Click and drag a new comment from the sidebar. Pick a color, choose your audience, a subject, message and click SAVE.Unless disabled, each team member on the project receives new comments also via email notifications. Comment by replying to email notifications or click the note on the project‘s dashboard or the note icon in the editor.
HotGloo has been used to wireframe the Oscars. When is your turn?
No credit card required. Whenever you feel ready choose a plan that fits.