Your first steps to a whole new wireframing experience.
Getting started wireframing with HotGloo.
Welcome dear wireframe rookie, sensei, guru or ninja. No matter which level you are at guess we all agree that getting started with a new tool takes some time. We created this guide to keep the learning curve as short as possible.
With this guide you will learn:
- How the wireframe editor works.
- What is EDIT mode?
- Switch to PREVIEW to test your interactions.
- Part 1: Editor first wireframing steps.
- Part 2: How to add interactions and variables.
- Part 3: What are Symbols and how to use them.
- Part 4: How to wireframe for different screen views (RWD).
- Part 5: Collaborative Wireframing.
- Part 6: Review and annotate wireframes.
- How to communicate wireframes.
- Shortcuts Cheat Sheet.
- Links & Resources
We are putting our heart and soul into offering the best experience when it comes to wireframing. If you have any questions, feedback, ideas or just want to say hi - contact us.
For the best user experience we recommend accessing HotGloo via Chrome, Firefox or Safari.
Now it‘s time to get started! Let them wires bleed :)
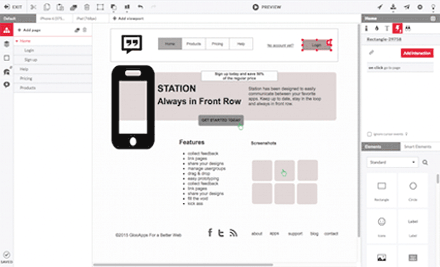
The Editor
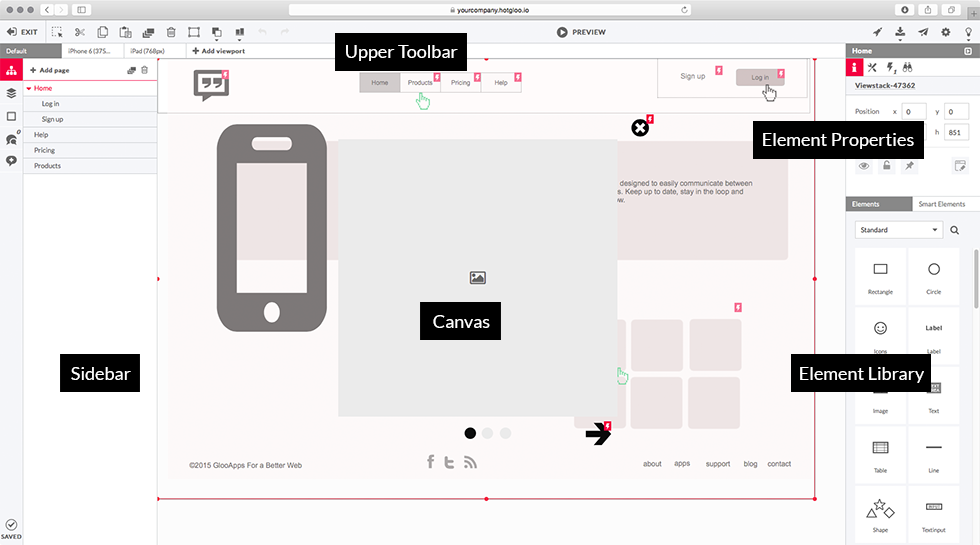
Canvas
The canvas size expands automatically or it can be easily adjusted to a fixed size within
Upper Toolbar
Switch from EDIT to PREVIEW in order to test your wireframe‘s interactions. You‘ll also find all standard commands (undo/redo, cut/copy/paste/duplicate/delete, align, bring to front/send to back, group/ungroup), responsive wireframing, settings (including a custom grid system), share project, add variables, export to HTML and online help/support.
Sidebar
The sidebar features the sitemap, layers view, page notes and comments. The sitemap represents the hierarchical order of your project‘s pages. Edit, delete, duplicate pages. Drag and drop to reorder.
Element Library
The element library features all common UI elements but also Symbols (interactive elements and masters) and many more. Elements are grouped by categories.
Element Properties
Select an element and you can edit its settings within properties: add color, change size and position or add interactions.
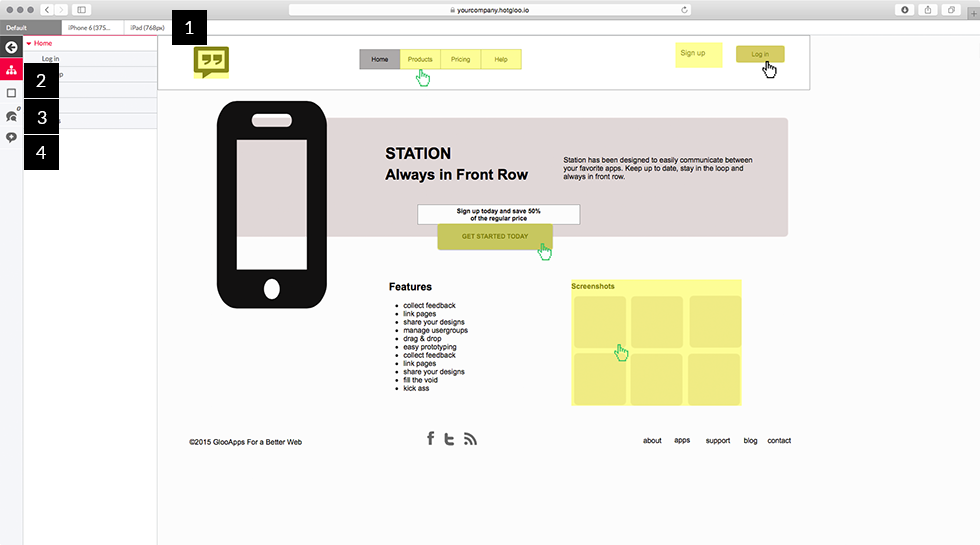
EDIT mode - where the wireframe magic is happening.

[1] Toolbar
switch from edit/preview; select all/cut/copy/paste/duplicate/delete; group/ungroup; bring forward/send backward/bring to front/send to back; align; add viewports; undo/redo; add variables; export; share project; settings (canvas size/grid); help
[2] Sitemap
add, sort, delete, duplicate, delete page
[3] Element library
Elements/Symbols
[4] Screen views
responsive wireframing mode
[5] Properties panel
- Color
- Font
- Specifications
- Interaction
- Observer
Switch to PREVIEW to test your interactions.
In Preview all your interactions are coming to life. Test your interactive wireframes or walk your client through a working prototype. You audience can leave feedback via comments delivered right to the editor, your account dashboard and to your email inbox.
[1] Change screen views
[2] Show/hide sidebar
[3] Show/hide page notes
[4] Show/hide/add comments
Pro tip: click shift to highlight all interactions.
Part 1: Say hello to your new wireframe tool :)
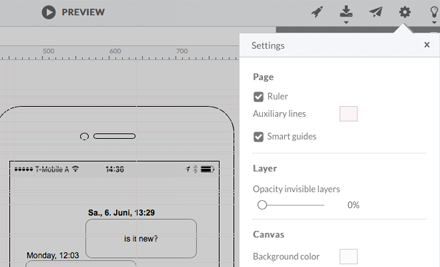
Step 1: Editing layout settings
When opening a project for the first time take a look at the project‘s settings. In SETTINGS you can activate ruler, smart guides, change the layer visibility, add a canvas background color and much more.
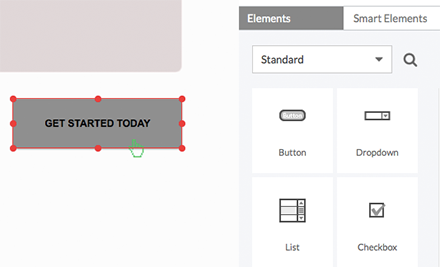
Step 2: Adding UI elements to the canvas
The element library features a wide range of standard elements (rectangle, circle, triangle, lines, ...) but also interactive elements that are highly interactive (viewstack, tab, formfields) and many more. You‘ll even find pre-made sets of interactive elements like signup boxes or date pickers.
To add elements to your wireframe just drag and drop them from the library onto the canvas.
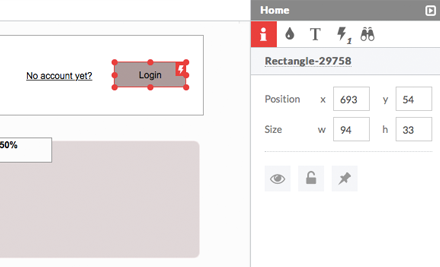
Step 3: Editing UI elements
Click an element to resize and to access the properties panel. Some elements you can double-click to add text to it or access their layers like with the Viewstack.
In the properties panel you can rename elements, change the position/size, lock the position, choose border color, fill, edit stroke strength and opacity, add rounded corners, edit font (size, color) and add interactions or tie an observer to the element.
Note: The properties window differs, depending on the selected element.
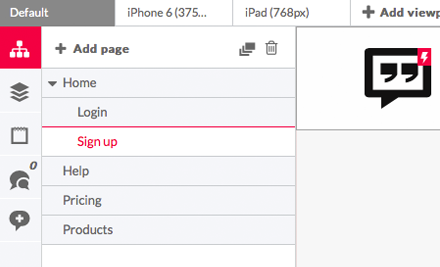
Step 4: Adding and editing pages to the sitemap
The sitemap is a set of pages on a web site, organized in hierarchical order. Add a new page by clicking the "+ Add Page" button, name your new page and hit return. Duplicate or delete pages by clicking the appropriate button. To reorganize the sitemap, hover over a page name, click on the 3 horizontal lines (located on the right) and drag and drop a page. Dragging a page onto an existing page will transform the page to a child page.
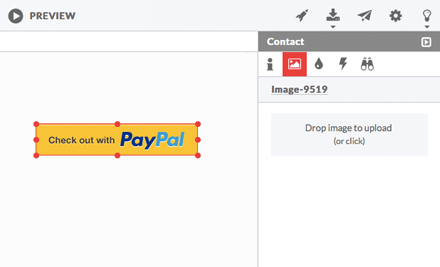
Step 5: Adding images
Upload images and use them in your project by simply drag and dropping them on the canvas. Or use the image placeholder and drag images from your desktop on the imageplaceholder whenever you are ready. Images will also be stored in the image library of the project. Access the image library by clicking on any image in your project or by dragging the image element to the canvas.
Part 2: Interactions turn your wireframes into working prototypes.
Step 1: Add interactions to elements
To add an interaction click the element that should trigger the interaction, select INTERACTIONS in the properties panel and make your selection. Test your interactions by switching to preview.
Set up interactions for an element, activated on:
- blur (interaction is fired once a text element loses the focus)
- change (fired upon element change)
- check/uncheck (fired upon item is being checked)
- click/tap (fired upon element click)
- focus (fired upon focus change)
- init (fired initially once you access the page the element is on)
- key press (fired upon certain key is pressed)
- mouse over/out (fired upon cursor over/out)
- swipe right/left/up/down (fired upon swipe in this direction)
...triggering an action:
- got to page, URL
- show message
- change element visibility (show/hide/toggle other elements)
- change view (of container elements like the viewstack)
- color
- arrange
- move by
- scroll to
- input value
- select item
- variable
e.g. You want to send a user to a specific page in your wireframe after clicking the "Sign-in Button". Click the button and add a "Go to Page" interaction and select the page you want to forward the user to. After setting up an interaction you can immediately switch to preview to test-drive it.
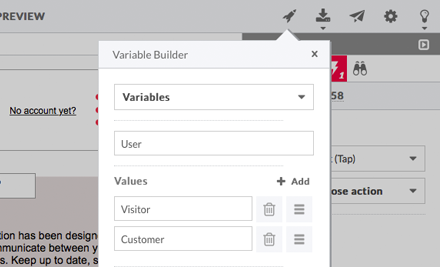
Step 2: Variable / Varibale Builder
With the variable builder you can simulate different sets of varia- bles. An observer links an element to a determined variable and an interaction is being carried out when this variable is being executed.
e.g. You created a sign-in panel and want to set up different variables. A variable could be a distinction between a signed-in customer versus a website visitor. You want the customer experience the website differently from a visitor by displaying different views of a menu or a different website content. Now you can set up a variable set with the role: Users and the variables: visitors & customers. Use a sign-in button to flip to customers and tie an obersver to a viewstack element to show a different view when this variable is executed.
Part 3: Using Symbols to speed up your wireframe workflow.
Step 1: What are Symbols?
Symbols are reusable templates you can quickly add to any page in your sitemap. The huge benefit of wireframing with them is that you edit them in one place but changes are being applied globally across your project on every page this element has been added to.
Use smart elememts for headers, footers, menu, sign-in boxes ... they work like masters you are probably familiar with from working with desktop tools.
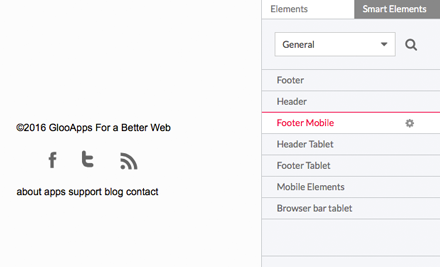
Step 2: Setting up Symbols
To create a Symbol just select the according tab in the element library and click ADD SYMBOL. In the Symbol canvas you can edit them. Once you are finished editing, close the master via the „X“ button. Add them on a page by simply drag and dropping it to the canvas like any other element. For editing it again, double click the Symbol on the canvas or in the Symbols list.
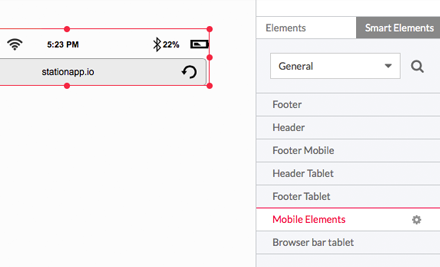
Part 4: Adaptive design through responsive wireframing with HotGloo.

Step 1: Choose your project type
Once you add a new project you can choose which viewport you‘d like to set up as your default viewport. Choose a standard desktop width or if starting with a mobile rst approach then you‘d select one of the mobile preferences (you can also choose a custom page width for your default viewport).
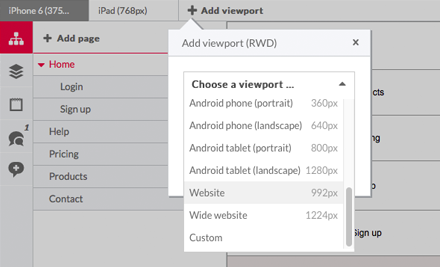
Step 2: Add viewports throughout your wireframing process
Throughout your wireframing process you might want to add ano- ther viewport. You can do so by choosing ADD VIEWPORT in the upper le toolbar and choose your viewport.
In a second step you can also choose if this viewport should copy/ paste any content from a previous viewport or if you‘d like to start with a blank page again. In the example above there are already two mobile viewports been wireframed. For adding a desktop viewport you‘d select WEBISTE and copy elements from either the iPhone viewort or the iPad viewport.
Part 5: Wireframe with your team. Review with stakeholders.
Step 1: Invite others to your account and add them to projects
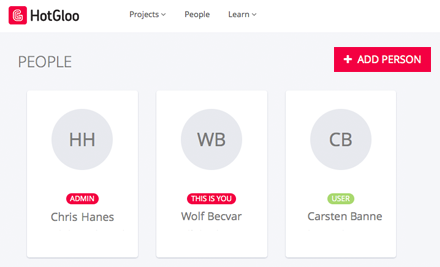
Invite team members or stakeholders to co-work on projects by inviting them to your account or by sending them share links. To add a new person just go to the PEOPLE page. Click the ADD PERSON button and fill out the details. We will send an invitation with further instructions to the person added. And don‘t forget to add them to a project!
TIP! You can give someone admin access when adding them.
An ADMIN can …
- create and edit projects
- add and manage people
- change project settings
An ADMIN can't …
- upgrade, downgrade, archive or cancel the account
- update the billing info
- view the billing statements
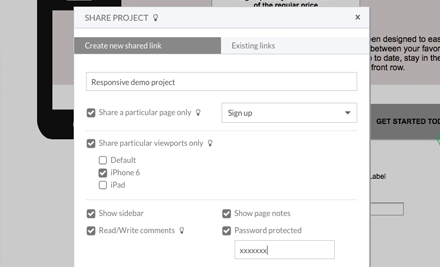
Step 2: Share a project
Generate a share link right out of the editor or on the project page and email it to clients to preview the current project state. Choose if you want to share a particular page or screen view only. Decide i f you want to show the sidebar and page notes, passwort protect your link and give the receiver the right to read/write comments on your designs.
Part 6: Review wireframes and leave comments.
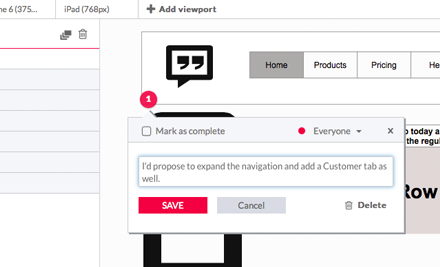
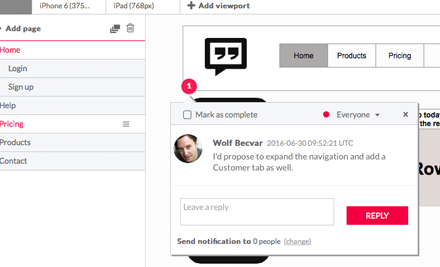
Step 1: Adding comments
Easily attach feedback comments to a particular element or area you want to discuss in depth with team members.
Click and drag a new comment from the sidebar. Pick a color, choose your audience, a subject, message and click SAVE.
Unless disabled, each team member on the project receives new comments also via email notifications. Comment by replying to email notifications or click the note on the project‘s dashboard or the note icon in the editor.
Step 2: Export comments
You can export all comments of a project to a single pdf file.
Click on the export icon in the upper toolbar and choose EXPORT TO PDF.
How to communicate wireframes
When communicating/presenting your wires to a client, we recommend using the page HOME for setting up a brief manual:
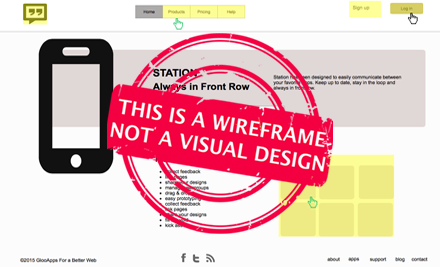
- Make your point and explain that they are looking at wireframes not at visual design.
- Explain further (if you haven‘t already) what wireframes are and why they are important.
- Have you built a working prototype, make a short description on how to interact with it, which steps a reviewer should take.
- Encourage them to leave feedback via feedback notes. Explain to them how feedback notes work and how the feedback process will look like.
- Offer assistance. If your client is reviewing wireframes for the first time, take them by the hand and walk them through the first steps together.
HotGloo Shortcuts Cheat Sheet
Common Shortcuts
Interaction Shortcuts (in preview)
Navigation
Tip! To keep an image from stretching too far vertically or horizontally simply click and hold SHIFT - then click on one corner of an element. Hold SHIFT and drag the corner of the element.
To select multiple elements press and hold SHIFT then click on the elements you want to select.
Shortcuts heavily depend on your Browser, OS and keyboard type. It could also happen that some shortcuts do not work in all browsers because the browser has already reserved a shortcut for a different action (i.e. Internet Explorer doesn’t support shortcuts at all, that’s why we are not recommending it).
Links & Resources
Great ideas need the right tool for the right job. Join today!
No credit card required. Whenever you feel ready choose a plan that fits.